Java Chatter and Random Nagging

Wednesday, November 29, 2006

Dumbster : mock SMTP server

My pet project, a Human Resource tool, sends emails to supervisors and employees when confirming vacations. However, I am working a lot in different locations (also the reason why I added this pet project to a Subversion repository) so most of the time I am developing without an internet connection or the configured SMTP server to reach.

In my search for a SMTP server that I could run on my localhost, I stumbled upon Dumbster. It is a fake SMTP server designed for unit and system testing applications that send email messages and is extremely easy to use. Its API contains only 6 classes and the unit testing works like a charm. For monitoring the mailing behavior while running the application I was able to create a small Swing GUI very quickly, based on the example in the dumbster jar file.

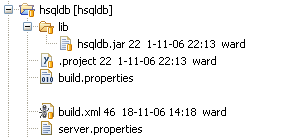
To make things a little easier and portable, I added it all to a seperate Eclipse project like I did in "Adding your development database under source control". Together with an Ant file to start up this SMTP monitoring application, I added the whole thing to source control.

Friday, November 24, 2006

Detecting period overlap

The application I am working on in my day job needed a feature which required detecting date overlap. After first trying the straightforward approach, which were far more boolean operations than I wanted, I stumbled upon the solution, which surprised me by its beautiful logic so I would love to share it.

The problem :
Given are two periods in time boundaried by two dates :
eg.
from
22 nov 2006 till 25 nov 2006(p1.from, p1.till)
from 18 nov 2006 till 23 nov 2006(p2.from, p2.till)

Now, how do we detect whether an overlap exists between these two periods ?

The Solution :
There are four different cases of overlap :The straightforward solution to this problem would require quite some boolean logic to check whether a certain period overlaps, since there are four possibilities. It would require a logic like :

(p2.from < p1.from) && (p2.till < p1.from) ||
(p2.till > p1.till) && (p2.from < p1.till) ||
...

to incorporate all overlapping cases in one boolean check.

However, as you can see on the figure, there are only two allowed cases, so we can better start from there.
The check whether a certain period is allowed (non-overlapping) is :

(p2.till < p1.from)||(p1.till < p2.from)

To get the opposite, namely to check whether a certain period is in overlap, we simply negate the expression to :

!((p2.till < p1.from)||(p1.till < p2.from))

This expression can be translated to :

(p2.till >= p1.from) && (p1.till >= p2.from)

As you can see, this exactly matches the overlap cases in the figure.
Finally, the old boolean logic from college is paying off !

Saturday, November 18, 2006

Adding your development database under source control

<disclaimer>
I am not too sure whether the technique I am going to present today falls under the category of Source Control best practices. But I have been using this technique for a while now, I kind of like it, and I didn't experience any problems with it.
</disclaimer>

I like HSQLDB, in fact, I like it a lot !
(For any Marsians, HSQLDB is the leading SQL relational database engine written in Java. It is also the database engine in OpenOffice.)
And since I am using HSQLDB for my petproject, I wanted it to be portable and easily configurable/buildable, just like the petproject itself. And I wanted to be able to start it up and shut it down (I use mainly the standalone server) from within my favorite IDE. So these are the steps it took to meet my requirements :
  1. In Eclipse, create a New Project (of the General type, since you don't need a Java compiler).
  2. Create the following files in this project:
    • lib/hsqldb.jar: the binary jar, downloaded from the HSQLDB website.
    • build.properties: contains the properties for the ant build file.
    • server.properties: contains the parameters for starting up the database server.
    • build.xml: the ant build file.
  3. Add the whole project to source control.


The content of each of these files (except for the .jar) :

server.properties

#Ant properties for starting the hsqlserver hrutil
server.port=9001
server.database.0=myProject
server.dbname.0=myProjectDB

build.properties

#Build properties for starting, stopping and communicating with the database
db.driver=org.hsqldb.jdbcDriver
db.url=jdbc:hsqldb:hsql://localhost/myProjectDB
db.user=sa
db.password=

build.xml

<project name="hsqldb" default="startup">
<property file="build.properties"/>
<property file="server.properties"/>

<path id="master-classpath">
<fileset dir="lib">
<include name="*.jar"/>
</fileset>
</path>


<target name="startup" description="Starts up the standalone hsqldb server.
The server will automatically use the properties from server.properties .">
<java classname="org.hsqldb.Server" classpathref="master-classpath" fork="true"/>
</target>

<target name="manager" description="Starts up the built-in hsqldb databasemanager.">
<java classname="org.hsqldb.util.DatabaseManager" classpathref="master-classpath" fork="true"/>
</target>

<target name="shutdown" description="Shuts down the standalone hsqldb server.">
<sql
driver="${db.driver}" classpathref="master-classpath"
url="${db.url}"
userid="${db.user}"
password="${db.password}">shutdown;
</sql>
</target>

<target name="deleteDbFiles" description="Deletes the script files that the hsqldb server has created (Necessary for a clean restart.)">
<delete>
<fileset dir="">
<include name="${server.database.0}.properties"/>
<include name="${server.database.0}.script"/>
</fileset>
</delete>
</target>
</project>

The descriptions in the build.xml should be pretty self-explanatory to use this configuration. Its startup and shutdown targets make it possible to start and stop your hsqldb database server from within Eclipse. And even better, when developing on another computer, simply import the project from source control and you are immediately ready to start the database!!

Monday, November 06, 2006

Source Control Best Practices

When googling around for source control best practices, I just came across this nice serie of articles about source control from Eric Sink. Although there is a lot of basic stuff here and Eric is sometimes biased to his own Vault product, it's definitely worth reading.

Another nice pdf about source control can be found with Eric's direct competitors at Perforce. It is a short article but packed with a lot of guidelines for optimal Software Configuration Management (SCM).

Friday, November 03, 2006

Source Control WTF

The project I am currently working on (an accounting application for an international express/freight company) has an interesting configuration/release management. Although CVS is used, clearly not all of its features are considered useful in this project.

An illustration :

A few weeks ago, when taking a first look at the source code, I noticed that there were no code comments present at all. Since such lack of documentation is no exception in the 'enterprisey' world, I didn't get too suspicious. However only a few minutes later, I noted the following at the header of the .java file :

// Decompiled by DJ v3.6.6.79 Copyright 2004 Atanas Neshkov Date: 06/01/2006 14:46:08

Now, DJ is a a Java Decompiler (decompile java CLASS files and save it in text or other format) so its appearance in an internal software project was kind of a mystery to me. It did explain the missing code comments since compiled class files are stripped from all comments. However, the idea became disturbing when I noticed that every single .java file had a header like that.

When asking the lead developer about this DJ tool, he simply replied that around June they had to discard all fresh changes from the project. Back then, it seems that the best way to do this was by decompiling the class files of the current production release.

Apparently, the practice of branching wasn't considered useful...

P.S. : Branching would be the best option in this case. Less good, but still better than decompiling, was to just replace all files with their version at a certain time (CVS supports this out of the box).

Thursday, November 02, 2006

Getting started with Subversion (and Eclipse)

I recently followed a course on Configuration Management and after reading some random sources on the net, the topic really got me interested. So now it's time to put some of the techniques into practice, with one of my current pet-projects as laboratory mouse. Today I start off with a quick guide on Subversion and how to get it working with Eclipse.

I installed both the SVN server (in my case in subversion_server folder) and the repositories on my external hard-drive, all under the folder name subversion_projects.

Installing it all on the external drive allows me to make things a little more portable and also to test the configuration on another pc. In the ideal world, I would install it on a server pc, but this will do for now.

Steps to get it working:
  1. Download Subversion (the server) and Install in the ${svn} directory ( Subversion folder in my case).
  2. Test the Subversion install by running ${svn}\bin\svnadmin
  3. Create a repository on the machine that is going to host your source code.

    I am creating one repository having the name of the big project. This project is going to consist of four or five eclipse projects with dependencies among each other. Some people choose to have one repository for each eclipse project, but if your eclipse projects are quite dependent on each other, create one big repository. (More info about laying out your projects here)
    The structure will be

    hammock/
    trunk/
    tags/
    branches/

    From the command line on the server machine, standing in the : ${svn}\bin directory :
    svnadmin create drive:\${REPOSITORIES-DIR}\${projectname}
    with
    ${REPOSITORIES-DIR
    } : the name of a folder that will contain all your Subversion source code repositories.
    ${projectname} : the name of the specific project you're going to create a repository for.
  4. Start the server from the command line:
    svnserve -d -r drive:\${REPOSITORIES-DIR}
  5. Within the drive:\${REPOSITORIES-DIR}\${projectname} directory, open the conf\svnserve.conf file using your text editor of choice and add the following to allow reading and writing to the users in the database we just created:

    [general]
    anon-access = none
    auth-access = write
    password-db = passwd

  6. Stil in the conf directory, edit the passwd file and add user = password
    For example :

    [users]
    ward = w4rd

  7. Start the server again from the command line:
    svnserve -d -r drive:\${
    REPOSITORIES-DIR}
  8. Create the trunk, tags and branches directories :
    svn mkdir -m "directory creation" svn://localhost/hammock/trunk --username ward --password w4rd
    svn mkdir -m "directory creation" svn://localhost/hammock/tags --username ward --password w4rd
    svn mkdir -m "directory creation" svn://localhost/hammock/branches --username ward --password w4rd
  9. Install SubClipse as described here. In short, the installation can be initiated from within Eclipse's Software Install (Find and Install..) using http://subclipse.tigris.org/update_1.0.x as the remote site.
  10. I was already working on an existing pet-project. To add it under source-control, you fire up your eclipse afterwards. Than you click the existing project and choose Team : Share -> SVN and select all sources you are wanting to add under source control. Add the eclipse project under trunk/${eclipse-project-name}.
  11. For first use, you have to configure the repository first. Choose svn://localhost/${projectname} as URL of the repository and type your user and password as configured in step 6.
  12. More info for daily use of Subversion can be found here.
    For in-depth use of SVN, the ultimate reference is the free SVN book, but my use of Subversion for my pet-project is too basic to need such extended book at the moment.
Personally, I chose not to install Tortoise SVN client because I am currently not needing source control outside of my Eclipse workspace or command line. However, if you do need that, an easy install can be found here.

P.S. I am running Windows XP but I don't expect much differences in approach for another OS (except for the slashes of course).